
In this blog, I’d like to present you the realization of my garden irrigation system and show you how easy and fast it is to set up and build. I own a small front yard and a back yard, which I care for with regular and intense irrigation. Especially in the summer this takes a lot of time. On top of that does the garden suffer immense during our yearly summer holiday trip, when I can’t take care of it. I had to find a solution.
Therefore, I decided a few years ago to build an automatic garden irrigation system. In the beginning I felt like it’d be too expensive and simply not necessary for a small garden like I have. But that didn’t turn out to be the case. Since I have my automatic garden irrigation system, is my garden green all around the year and the plants grow and bloom. In addition, I save a lot of time daily, which I used to spend watering everything myself.
My Garden
Even though my 150 square yard garden plus my 60 square yard front garden is in total not much, building my automatic garden irrigation system was still a good idea.

The lawn is directly bordering the terrace. Here I used two Hunter sprinkler (LINK) left and right of the terrace to water the back yard. The water pipeline and the connecting elements are by Gardena. My system gets its water by a well with a depth of 6 meter. The water gets pumped up by a Kärcher GP40 pump with 3,6 bar pressure. Kärcher offers a similar product by now.

The front yard consists of a parking space, the entry to the house and two green areas, which need to be watered. For that I set up 4 Hunter Nozzles with different nozzles for different distances. The radius of effect can be changed manually for every nozzle. The system gets fed water by the same pump I mentioned before.
Before I started planning my project, I checked different manufacturers and their products, as well as reading about other people experiences in online forums, to get a general idea. For example, I decided to use the spray bodies by Hunter, because they’re popular in Florida and California. That is one of the impressions I got on my holiday trips. Due to the hot and dry periods in those countries, they get used daily and have to be reliable and precise.
The Water installation for the garden irrigation
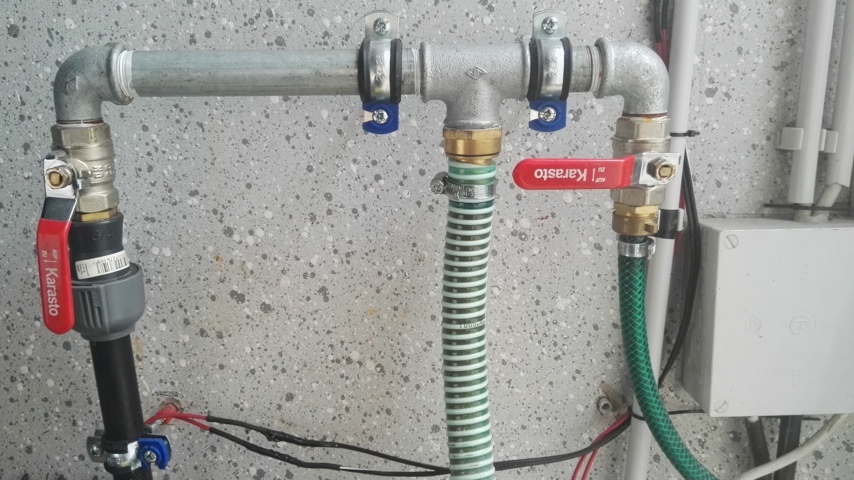
I use the well with the pump I already had by Kärcher (Type GP40 / 3,6 bar), as my water supply. Its connected with the middle tube. Because the pump is not only supplying my garden-irrigation-system on the left side, but also my gardening hose (see picture right connection), I built this pipe distribution with two valves.
The spray bodies for the irrigation
I have two kinds of spray bodies in service:
Rotors by Hunter for the lawn in the back yard: The rotors by Hunter exist in different variations. They differ in e.g. radius, water flow and inlet size. Depending on which kind of rotor you decided, you can fit it with a variety of different nozzles. The spray bodies can be set to a radius between 50° and 360°. The connection to the water pipeline is possible through an inlet of 1/2″ or 3/4″, which is an important factor when choosing your spray body. Both sizes of inlets are compatible with the products of Gardena. In my project I used 2 Hunter I-20 rotors, which cover a radius of 90° with a slow and consistent turning movement. Both effective areas overlap, as seen in the picture above.
Hunter Pro-Spray with adjustable nozzles for the front yard: This System waters a constant area with a layer of big water drops. You can find a variety of nozzles for the different radius with up to 5,2 meters. I’m using nozzles with a radius of 1,8m and 3m, due to the small size of the green areas in my front yard. These nozzles can cover between 0° and 360° around the spray body with a constant irrigation. The connection to the water pipeline is only possible with a 1/2″ inlet. You have to take care of that fact when you connect it to the Gardena water pipeline.
On top of that you can find extensive information on the products by reading the Hunter website. There are also further information in my Blog.
The Water pipeline for the garden irrigation system
To build a simple and reliable water supply from the pump to the spray bodies, I decided to use Gardena’s “Quick and Easy” pipe connection system. The Gardena system offers a variety of pipelines, connection pieces (L-/T-piece), end pieces, as well as drainage valves for frost-proofing. The pipeline is easy and fast to assemble with a handsaw and sandpaper for deburring. When planning the pipeline system, don’t forget to build in a drainage valve at the deepest point to frost-proof the whole system. The valve opens automatically when there is no pressure in on the pipe anymore. This lets the water drain into the ground. Therefore, you should build the valve into a bed of gravel.
To top it off I connected my automatic garden irrigation system to my smart home system with the HomeMatic controller. You can find my explanation for that on Automation. If you want to know which products I used for my realization, the take a look at Setup. For further information on my garden irrigation system, you can take a look at my other blog entries on.