
The water pipeline is an important element for automatic garden irrigation. Gardena offers a solution that makes this easy and reliable. Thanks to the “Quick & Easy” quick connection technology, the Gardena pipeline can literally be relocated “in no time”. With the various laying modules, the pipeline adapts flexibly to the conditions of the garden. Pipe assembly as well as subsequent extensions and modifications are extremely easy to implement: put the pipe and connector together – turn – done.
When assembling the pipeline, it’s a good idea to take a closer look how it works. The pipeline consists of the pipe with a diameter of 25mm. With a hand saw or a special pair of scissors you can do it. The laying tube can thus easily edit and bring it to the right length. It is important to have a clear cut at the end of the pipe. In order to connect the different Gardena blocks with the laying pipe, push the laying pipe approximate 6cm into the building block. Here is an O-ring after about 3cm to overcome. This creates a watertight connection. In my blog Gardena connection test, I tested connection strength of the Gardena pipeline times.
As a laying pipe, Gardena pipe provides three different lengths of 50m and 25m with a diameter of 25mm.
You can use the pipe with an operating pressure of up to 6 bar. Long-lasting durability is ensured by the high-quality material used to make the laying pipe. Thus, it is UV-resistant, opaque and resistant to aging and weathering. Before installing it is an advantage to roll off the roller and put it in the sun, so it is easier to work with the pipe. When setting up the Gardena pipe, please make sure that no dirt or earth enters the Gardena pipe. Here it helps, the ends in the construction phase temporarily with a Gardena tail article no. 2778 to provide.
Gardena pipeline connections
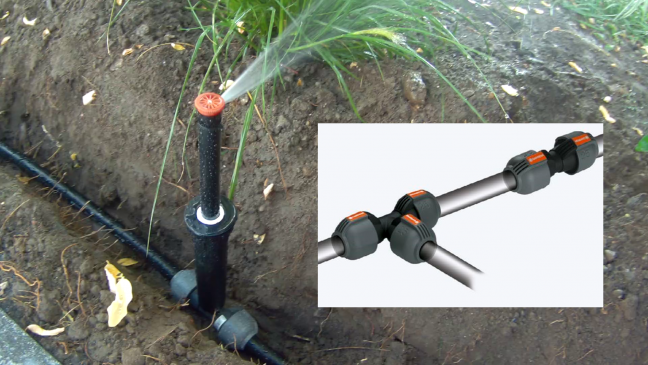
For the possible pipe connections, Gardena offers the following components with 25mm diameter. This can be used to make installation pipe extensions, T-piece or L-piece directional changes, or pipe end terminations.
When you are living in a area with cold winter, frost protection must be considered. Therefore Gardena offers drainage valves. Add the drain value at the lowest points of the individual Gardena pipeline. The drainage valve open automatically when the water pressure is less than 0.2 bar, and thus empty the respective pipe. I have described the installation of these drainage valves in the blog “Drainage valve”. The drain valve can install in the pipe with a T-piece or at the end of the pipe.
Gardena sprinkler connections
Various connecting parts are available for installing the sprinklers in the pipeline. All these are suitable for the 25mm Gardena pipeline. However, it must ensure during planning that the internal thread of the sprinkler matches the connecting element. Gardena provides ½” and ¾” external threads. Thus, the Hunter sprinklers can screw fit on the fasteners. The Hunter Sprinklers also have ½ ” or ¾ ” internal threads.
Use the connection elements to connect the Gardena pipeline with Hunter sprinklers for the pipe run, in the corner area or at the pipe end.
Additional information about planning your automatic garden irrigation with the Gardena pipeline are available in my blog checklist automatic garden irrigation or have a look at my project.
You are on my blog: Gardena pipeline for automatic garden irrigation